<p>文章均转自网络,做个备注</p><p style="margin-top: 0px; margin-bottom: 15px; color: rgb(85, 85, 85); font-family: "Microsoft Yahei", "Helvetica Neue", Helvetica, Arial, sans-serif; font-size: 15px; white-space: normal;">下一代高速wireguard,以上来自英文自动翻译,避免大规模的网络传输的headers,大体意思是更底层一些,效率更高一些,速度更快一些,测试过程中分别使用搬瓦工GIA和GCE台湾,两者均能秒开4K,前者40M左右,后者60M左右,可以说速度起飞了,放下youtube截图。视频教程已上传youtube,<span style="color: rgb(0, 0, 255);">点击观看(需FQ)</span>。</p><p style="margin-top: 0px; margin-bottom: 15px; color: rgb(85, 85, 85); font-family: "Microsoft Yahei", "Helvetica Neue", Helvetica, Arial, sans-serif; font-size: 15px; white-space: normal;">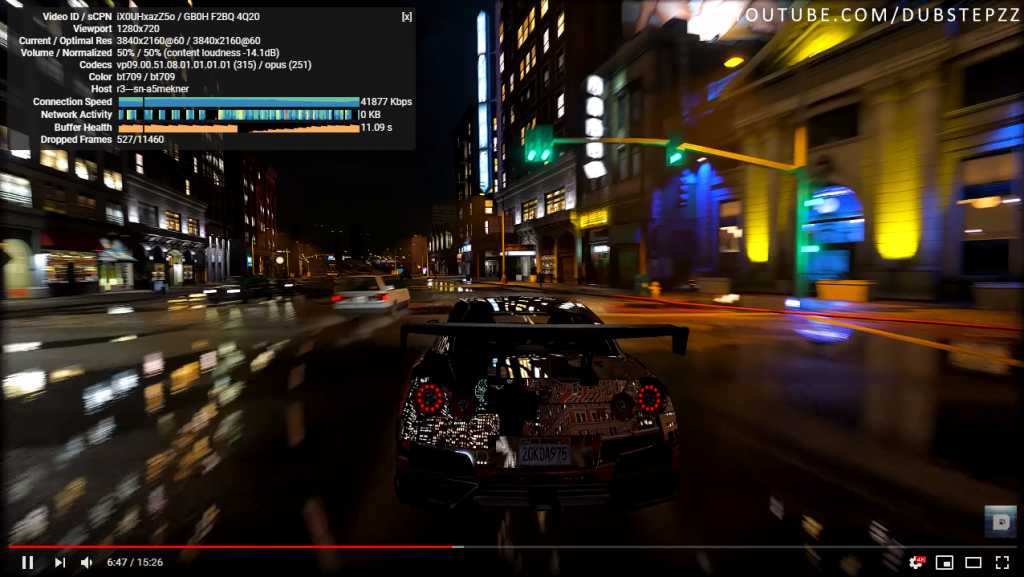
 </p><p style="margin-top: 6px; padding: 0px; font-size: 14px; color: rgb(85, 85, 85); font-family: "Microsoft Yahei", "Helvetica Neue", Helvetica, Arial, sans-serif; white-space: normal;"></p><h2 style="margin: 20px -20px 20px -24px; color: rgb(85, 85, 85); line-height: 1.125rem; text-rendering: optimizelegibility; padding: 10px 20px 9px 10px; border-left: 8px solid rgb(0, 166, 124); background-color: rgb(251, 251, 251); font-size: 1.125rem; border-bottom: 1px solid rgb(0, 166, 124); font-family: "Microsoft Yahei", "Helvetica Neue", Helvetica, Arial, sans-serif; white-space: normal;">关于一键脚本(<span style="color: rgb(51, 153, 102);">必看</span>)</h2><blockquote style="margin: 15px auto; padding: 5px 15px 10px; border-width: 1px 1px 1px 3px; border-style: solid; border-color: rgb(214, 233, 198); border-image: initial; background-color: rgb(250, 252, 249); font-size: 0.875rem; color: rgb(85, 85, 85); font-family: "Microsoft Yahei", "Helvetica Neue", Helvetica, Arial, sans-serif; white-space: normal;"><p style="margin-top: 6px; white-space: normal; padding: 0px; font-size: 14px; color: rgb(85, 85, 85); font-family: "Microsoft Yahei", "Helvetica Neue", Helvetica, Arial, sans-serif;">1、<span style="color: rgb(255, 0, 0);">仅适用于centos7系统</span>,ubuntu一键脚本可使用另一篇教程:ubuntu一键安装wireguard</p><p style="margin-top: 6px; white-space: normal; padding: 0px; font-size: 14px; color: rgb(85, 85, 85); font-family: "Microsoft Yahei", "Helvetica Neue", Helvetica, Arial, sans-serif;">2、VPS架构必须是KVM</p><p style="margin-top: 6px; white-space: normal; padding: 0px; font-size: 14px; color: rgb(85, 85, 85); font-family: "Microsoft Yahei", "Helvetica Neue", Helvetica, Arial, sans-serif;">3、测试了<span style="color: rgb(255, 153, 0);">搬瓦工、谷歌云、Vultr</span>的centos7,可以完美搞定</p><p style="margin-top: 6px; white-space: normal; padding: 0px; font-size: 14px; color: rgb(85, 85, 85); font-family: "Microsoft Yahei", "Helvetica Neue", Helvetica, Arial, sans-serif;">4、cento7大部分内核都是3.10,不能正确安装,所以需要升级</p><p style="margin-top: 6px; white-space: normal; padding: 0px; font-size: 14px; color: rgb(85, 85, 85); font-family: "Microsoft Yahei", "Helvetica Neue", Helvetica, Arial, sans-serif;">5、有些厂商的vps内核貌似升级不了,例如vpsserver,这个还是要自行解决</p><p style="margin-top: 6px; white-space: normal; padding: 0px; font-size: 14px; color: rgb(85, 85, 85); font-family: "Microsoft Yahei", "Helvetica Neue", Helvetica, Arial, sans-serif;">6、wireguard是一个peer对应一个客户端,如果需要多个客户端使用可<span style="color: rgb(0, 0, 255);">查看多用户配置视频</span>。</p></blockquote><h2 style="margin: 20px -20px 20px -24px; color: rgb(85, 85, 85); line-height: 1.125rem; text-rendering: optimizelegibility; padding: 10px 20px 9px 10px; border-left: 8px solid rgb(0, 166, 124); background-color: rgb(251, 251, 251); font-size: 1.125rem; border-bottom: 1px solid rgb(0, 166, 124); font-family: "Microsoft Yahei", "Helvetica Neue", Helvetica, Arial, sans-serif; white-space: normal;">教程开始(<span style="color: rgb(51, 153, 102);">必看</span>)</h2><p style="margin-top: 0px; margin-bottom: 15px; color: rgb(85, 85, 85); font-family: "Microsoft Yahei", "Helvetica Neue", Helvetica, Arial, sans-serif; font-size: 15px; white-space: normal;">1、VPS应安装为centos7系统,使用xshell或其他ssh工具连接VPS后,执行下面命令:</p><pre class="prettyprint linenums" style="padding: 8px; border-radius: 2px; color: rgb(68, 68, 68); margin-top: 0px; margin-bottom: 20px; border: 1px solid rgb(238, 238, 238); white-space: pre-wrap; overflow-wrap: break-word; font-size: 0.875rem; line-height: 1.25rem; word-break: break-all; overflow: hidden; box-shadow: rgb(238, 238, 238) 40px 0px 0px inset, rgb(51, 183, 150) 42px 0px 0px inset; font-family: Consolas, "Bitstream Vera Sans Mono", "Courier New", Courier, monospace !important;">yum install -y wget && wget https://raw.githubusercontent.com/atrandys/wireguard/master/wireguard_install.sh ;&& chmod +x wireguard_install.sh && ./wireguard_install.sh</pre><p style="margin-top: 0px; margin-bottom: 15px; color: rgb(85, 85, 85); font-family: "Microsoft Yahei", "Helvetica Neue", Helvetica, Arial, sans-serif; font-size: 15px; white-space: normal;">2、执行脚本会弹出选择项,首先我们选择安装内核,安装过程中需要几分钟,最后按照提示重启。</p><p style="margin-top: 0px; margin-bottom: 15px; color: rgb(85, 85, 85); font-family: "Microsoft Yahei", "Helvetica Neue", Helvetica, Arial, sans-serif; font-size: 15px; white-space: normal;">
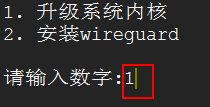 </p><p style="margin-top: 0px; margin-bottom: 15px; color: rgb(85, 85, 85); font-family: "Microsoft Yahei", "Helvetica Neue", Helvetica, Arial, sans-serif; font-size: 15px; white-space: normal;">3、重启完毕,使用xshell连接VPS,执行下面命令:</p><pre class="prettyprint linenums" style="padding: 8px; border-radius: 2px; color: rgb(68, 68, 68); margin-top: 0px; margin-bottom: 20px; border: 1px solid rgb(238, 238, 238); white-space: pre-wrap; overflow-wrap: break-word; font-size: 0.875rem; line-height: 1.25rem; word-break: break-all; overflow: hidden; box-shadow: rgb(238, 238, 238) 40px 0px 0px inset, rgb(51, 183, 150) 42px 0px 0px inset; font-family: Consolas, "Bitstream Vera Sans Mono", "Courier New", Courier, monospace !important;">./wireguard_install.sh</pre><p style="margin-top: 0px; margin-bottom: 15px; color: rgb(85, 85, 85); font-family: "Microsoft Yahei", "Helvetica Neue", Helvetica, Arial, sans-serif; font-size: 15px; white-space: normal;">4、执行命令会弹出和第2步相同的选择项,这次我们选择安装wireguard,安装过程中需要等几分钟,安装完成服务即自行启动了。</p><p style="margin-top: 0px; margin-bottom: 15px; color: rgb(85, 85, 85); font-family: "Microsoft Yahei", "Helvetica Neue", Helvetica, Arial, sans-serif; font-size: 15px; white-space: normal;">
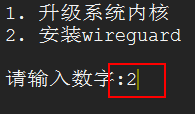 </p><p style="margin-top: 0px; margin-bottom: 15px; color: rgb(85, 85, 85); font-family: "Microsoft Yahei", "Helvetica Neue", Helvetica, Arial, sans-serif; font-size: 15px; white-space: normal;">5、使用xftp等ftp工具连接vps,进入/etc/wireguard/目录,然后将client.conf下载到本地电脑。(这个配置文件里面包含的是客户端的各种参数,mac、linux客户端也是使用这些参数。)</p><p style="margin-top: 0px; margin-bottom: 15px; color: rgb(85, 85, 85); font-family: "Microsoft Yahei", "Helvetica Neue", Helvetica, Arial, sans-serif; font-size: 15px; white-space: normal;">
 </p><p style="margin-top: 0px; margin-bottom: 15px; color: rgb(85, 85, 85); font-family: "Microsoft Yahei", "Helvetica Neue", Helvetica, Arial, sans-serif; font-size: 15px; white-space: normal;">6、下载安装TunSafe,这是一个windows端的第三方客户端,因为官方windows版本的还没开发完成,先用这个软件代替,TunSafe已经开源了,可以放心使用。</p><blockquote style="margin: 15px auto; padding: 5px 15px 10px; border-width: 1px 1px 1px 3px; border-style: solid; border-color: rgb(214, 233, 198); border-image: initial; background-color: rgb(250, 252, 249); font-size: 0.875rem; color: rgb(85, 85, 85); font-family: "Microsoft Yahei", "Helvetica Neue", Helvetica, Arial, sans-serif; white-space: normal;"><p style="margin-top: 6px; padding: 0px; font-size: 0.875rem;">官网下载:<span style="color: rgb(0, 0, 255);">TunSafe</span></p></blockquote><p style="margin-top: 0px; margin-bottom: 15px; color: rgb(85, 85, 85); font-family: "Microsoft Yahei", "Helvetica Neue", Helvetica, Arial, sans-serif; font-size: 15px; white-space: normal;">7、打开TunSafe,点击file,选择import file,选择第5步下载的client.conf文件,导入到软件中。</p><p style="margin-top: 0px; margin-bottom: 15px; color: rgb(85, 85, 85); font-family: "Microsoft Yahei", "Helvetica Neue", Helvetica, Arial, sans-serif; font-size: 15px; white-space: normal;">
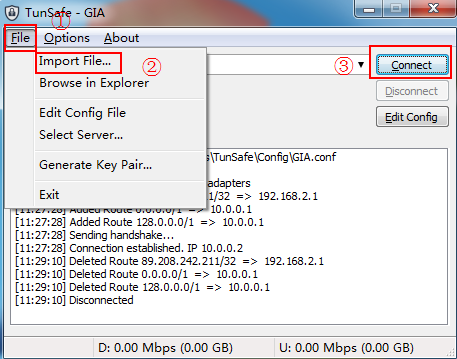 </p><p style="margin-top: 0px; margin-bottom: 15px; color: rgb(85, 85, 85); font-family: "Microsoft Yahei", "Helvetica Neue", Helvetica, Arial, sans-serif; font-size: 15px; white-space: normal;">8、导入后会自动连接,连接成功后,所有流量都会被代理,也就是全局代理。</p><p style="margin-top: 0px; margin-bottom: 15px; color: rgb(85, 85, 85); font-family: "Microsoft Yahei", "Helvetica Neue", Helvetica, Arial, sans-serif; font-size: 15px; white-space: normal;">9、使用Linux、Mac系统的同学,可以去官方查看一下如何安装对应的客户端,比较简单,这里就不讲了。</p><h2 style="margin: 20px -20px 20px -24px; color: rgb(85, 85, 85); line-height: 1.125rem; text-rendering: optimizelegibility; padding: 10px 20px 9px 10px; border-left: 8px solid rgb(0, 166, 124); background-color: rgb(251, 251, 251); font-size: 1.125rem; border-bottom: 1px solid rgb(0, 166, 124); font-family: "Microsoft Yahei", "Helvetica Neue", Helvetica, Arial, sans-serif; white-space: normal;">安卓版客户端教程</h2><p style="margin-top: 0px; margin-bottom: 15px; color: rgb(85, 85, 85); font-family: "Microsoft Yahei", "Helvetica Neue", Helvetica, Arial, sans-serif; font-size: 15px; white-space: normal;">1、去Google Play下载wireguard,目前这个软件在Google Play中是未发布版,也可直接下载下面的f-droid的安装包。</p><blockquote style="margin: 15px auto; padding: 5px 15px 10px; border-width: 1px 1px 1px 3px; border-style: solid; border-color: rgb(214, 233, 198); border-image: initial; background-color: rgb(250, 252, 249); font-size: 0.875rem; color: rgb(85, 85, 85); font-family: "Microsoft Yahei", "Helvetica Neue", Helvetica, Arial, sans-serif; white-space: normal;"><p style="margin-top: 6px; padding: 0px; font-size: 0.875rem;">安卓版wireguard:点击下载</p><p style="margin-top: 6px; padding: 0px; font-size: 0.875rem;">本地下载:</p></blockquote><p style="margin-top: 0px; margin-bottom: 15px; color: rgb(85, 85, 85); font-family: "Microsoft Yahei", "Helvetica Neue", Helvetica, Arial, sans-serif; font-size: 15px; white-space: normal;">2、将软件安装好,并将本教程服务端获取的client.conf文件传输到手机中。打开软件,点击加号,在弹出的页面选择create from file or archive,然后选择保存在手机的conf文件。</p><blockquote style="margin: 15px auto; padding: 5px 15px 10px; border-width: 1px 1px 1px 3px; border-style: solid; border-color: rgb(214, 233, 198); border-image: initial; background-color: rgb(250, 252, 249); font-size: 0.875rem; color: rgb(85, 85, 85); font-family: "Microsoft Yahei", "Helvetica Neue", Helvetica, Arial, sans-serif; white-space: normal;"><p style="margin-top: 6px; padding: 0px; font-size: 0.875rem;"><span style="color: rgb(255, 0, 0);">注意</span>:这里可能会提示错误,原因是没有文件操作权限,去权限管理里给软件勾上存储权限即可。</p></blockquote><p style="margin-top: 0px; margin-bottom: 15px; color: rgb(85, 85, 85); font-family: "Microsoft Yahei", "Helvetica Neue", Helvetica, Arial, sans-serif; font-size: 15px; white-space: normal;">
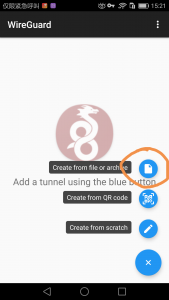 </p><p style="margin-top: 0px; margin-bottom: 15px; color: rgb(85, 85, 85); font-family: "Microsoft Yahei", "Helvetica Neue", Helvetica, Arial, sans-serif; font-size: 15px; white-space: normal;">选择文件后如下图所示</p><p style="margin-top: 0px; margin-bottom: 15px; color: rgb(85, 85, 85); font-family: "Microsoft Yahei", "Helvetica Neue", Helvetica, Arial, sans-serif; font-size: 15px; white-space: normal;">
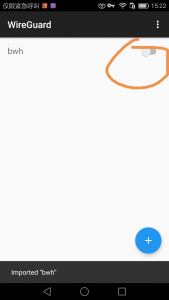 </p><p style="margin-top: 0px; margin-bottom: 15px; color: rgb(85, 85, 85); font-family: "Microsoft Yahei", "Helvetica Neue", Helvetica, Arial, sans-serif; font-size: 15px; white-space: normal;">开启代理即可。</p><h2 style="margin: 20px -20px 20px -24px; color: rgb(85, 85, 85); line-height: 1.125rem; text-rendering: optimizelegibility; padding: 10px 20px 9px 10px; border-left: 8px solid rgb(0, 166, 124); background-color: rgb(251, 251, 251); font-size: 1.125rem; border-bottom: 1px solid rgb(0, 166, 124); font-family: "Microsoft Yahei", "Helvetica Neue", Helvetica, Arial, sans-serif; white-space: normal;">iOS版客户端</h2><p style="margin-top: 0px; margin-bottom: 15px; color: rgb(85, 85, 85); font-family: "Microsoft Yahei", "Helvetica Neue", Helvetica, Arial, sans-serif; font-size: 15px; white-space: normal;">现在是测试版,官方和tunsafe都提供了测试版,需要先进链接安装testflight,然后再在手机上打开这个测试版连接,就可以跳转到testflight,然后安装就可以了</p><blockquote style="margin: 15px auto; padding: 5px 15px 10px; border-width: 1px 1px 1px 3px; border-style: solid; border-color: rgb(214, 233, 198); border-image: initial; background-color: rgb(250, 252, 249); font-size: 0.875rem; color: rgb(85, 85, 85); font-family: "Microsoft Yahei", "Helvetica Neue", Helvetica, Arial, sans-serif; white-space: normal;"><p style="margin-top: 6px; padding: 0px; font-size: 0.875rem;"><span style="color: rgb(0, 0, 255);"><span style="color: rgb(0, 0, 0);">官方ios版:</span>wireguard测试版</span></p><p style="margin-top: 6px; padding: 0px; font-size: 0.875rem;">Tunsafe ios版:在非国区app store搜索tunsafe安装即可。</p></blockquote><p style="margin-top: 0px; margin-bottom: 15px; color: rgb(85, 85, 85); font-family: "Microsoft Yahei", "Helvetica Neue", Helvetica, Arial, sans-serif; font-size: 15px; white-space: normal;">导入测试文件很简单,可以直接打开软件,扫描服务上生成的二维码,也可以把文件复制到手机,然后用软件打开。</p><h2 style="margin: 20px -20px 20px -24px; color: rgb(85, 85, 85); line-height: 1.125rem; text-rendering: optimizelegibility; padding: 10px 20px 9px 10px; border-left: 8px solid rgb(0, 166, 124); background-color: rgb(251, 251, 251); font-size: 1.125rem; border-bottom: 1px solid rgb(0, 166, 124); font-family: "Microsoft Yahei", "Helvetica Neue", Helvetica, Arial, sans-serif; white-space: normal;">多用户</h2><p style="margin-top: 0px; margin-bottom: 15px; color: rgb(85, 85, 85); font-family: "Microsoft Yahei", "Helvetica Neue", Helvetica, Arial, sans-serif; font-size: 15px; white-space: normal;">wireguard一个配置文件同一时间只能连接一个设备,所以你如果需要多用户,那么需要多个配置文件。</p><p style="margin-top: 0px; margin-bottom: 15px; color: rgb(85, 85, 85); font-family: "Microsoft Yahei", "Helvetica Neue", Helvetica, Arial, sans-serif; font-size: 15px; white-space: normal;">多用户配置可以参考<span style="color: rgb(0, 0, 255);"><span style="font-weight: 700;">这个视频</span></span>,讲解的应该够清楚。</p><h2 style="margin: 20px -20px 20px -24px; color: rgb(85, 85, 85); line-height: 1.125rem; text-rendering: optimizelegibility; padding: 10px 20px 9px 10px; border-left: 8px solid rgb(0, 166, 124); background-color: rgb(251, 251, 251); font-size: 1.125rem; border-bottom: 1px solid rgb(0, 166, 124); font-family: "Microsoft Yahei", "Helvetica Neue", Helvetica, Arial, sans-serif; white-space: normal;"><span style="color: rgb(255, 0, 0);">非常重要</span></h2><p style="margin-top: 0px; margin-bottom: 15px; color: rgb(85, 85, 85); font-family: "Microsoft Yahei", "Helvetica Neue", Helvetica, Arial, sans-serif; font-size: 15px; white-space: normal;"><span style="color: rgb(255, 0, 0);">这里是一些大家wireguard后遇到各种问题的排查过程,遇到问题先来这里看,有遇到问题自行解决过了而且下面没提及到的,请各位童鞋留言,我会补充上。</span></p><blockquote style="margin: 15px auto; padding: 5px 15px 10px; border-width: 1px 1px 1px 3px; border-style: solid; border-color: rgb(214, 233, 198); border-image: initial; background-color: rgb(250, 252, 249); font-size: 0.875rem; color: rgb(85, 85, 85); font-family: "Microsoft Yahei", "Helvetica Neue", Helvetica, Arial, sans-serif; white-space: normal;"><p style="margin-top: 6px; padding: 0px; font-size: 0.875rem;"><span style="font-weight: 700;">服务端</span></p><p style="margin-top: 6px; padding: 0px; font-size: 0.875rem;">1、首先使用 <span style="color: rgb(0, 51, 102);">wg</span> 命令,查看wireguard服务是否正常启动,peer是否正常。</p><p style="margin-top: 6px; padding: 0px; font-size: 0.875rem;">2、检查配置文件wg0.conf,ip不可使用ipv6,因为ip是自动联网查询的,有可能会得到ipv6地址,需要改成ipv4的地址。</p><p style="margin-top: 6px; padding: 0px; font-size: 0.875rem;">3、使用 <span style="color: rgb(0, 51, 102);">ip link</span> 命令查看物理网卡是否为eth0,如果不是将真实名称(除了lo、wg0的那个网卡)替换wg0.conf中的eth0。</p><p style="margin-top: 6px; padding: 0px; font-size: 0.875rem;">4、你的云服务商的防火墙是否放行。像谷歌云/阿里云等在web控制台都可以看到防火墙设置,需自行配置放行规则。</p><p style="margin-top: 6px; padding: 0px; font-size: 0.875rem;">5、你的云服务器的内网IP段不要和10.0.0.1/24冲突,我遇到过谷歌云内网网段(自己配置的)和wg使用的网段冲突的情况,这种问题很少见,除非是你自己配置的内网IP。</p><p style="margin-top: 6px; padding: 0px; font-size: 0.875rem;"><span style="font-weight: 700;">客户端(windows)</span></p><p style="margin-top: 6px; padding: 0px; font-size: 0.875rem;">1、用管理员权限打开tunsafe,不要同时开启其他代理类软件。</p><p style="margin-top: 6px; padding: 0px; font-size: 0.875rem;">2、如果是电脑直接拨号上网,可能会出现无法连接的情况,换路由器拨号。</p><p style="margin-top: 6px; padding: 0px; font-size: 0.875rem;">3、有安装过SSTAP的情况(它安装的虚拟网卡会设置静态IP),wireguard可能会共用sstap安装的网卡,注意把这个虚拟网卡的ip和dns设置为自动获取。</p><p style="margin-top: 6px; padding: 0px; font-size: 0.875rem;">4、安装过其他VPN的卸载一下,重装tunsafe试试。</p><p style="margin-top: 6px; padding: 0px; font-size: 0.875rem;">5、本地ip地址可能是10.0.0.1/24网段的,会有冲突,给wireguard设置其他网段,默认10.0.0.1改成其他,例如10.8.0.1。</p><p style="margin-top: 6px; padding: 0px; font-size: 0.875rem;"><span style="font-weight: 700;">重装!!!</span></p><p style="margin-top: 6px; padding: 0px; font-size: 0.875rem;">如果以上问题你确实排查过了,那么很可能是tunsafe安装有问题,需要你卸载tunsafe,卸载TAP虚拟网卡,重新安装tunsafe,安装过程中所有权限都有要允许,有什么安全软件提示也要允许,重新试一下。</p></blockquote><p style="margin-top: 6px; padding: 0px; font-size: 14px; color: rgb(85, 85, 85); font-family: "Microsoft Yahei", "Helvetica Neue", Helvetica, Arial, sans-serif; white-space: normal;"><br/></p>
标签: none